3.F.A. Screen Configuration
|
 Screen Configuration

(klicken Sie die Kacheln an um zum jeweiligen Punkt zu springen)
---
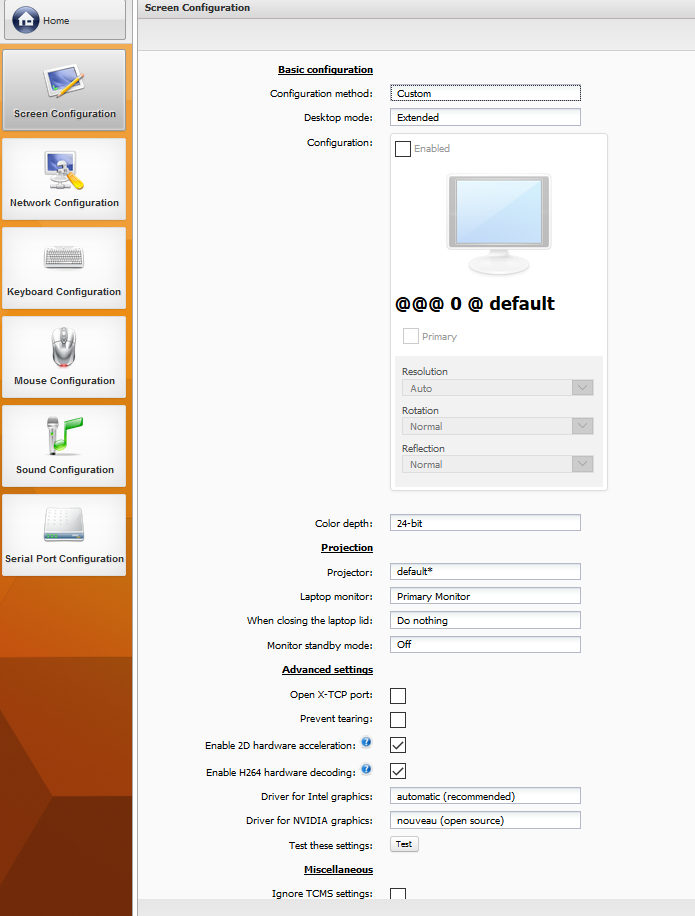
Here you can setup any screen connected to this Thin Client.
Basic configuration
Configuration method: allows you to specify the degree of complexity and depth for the screen configuration, so it suits your level of expertise.
Please note that this setting has an effect on what settings will be displayed. Settings that are listed in this documentation but not displayed in the configuration screen are probably not being displayed, due to your chosen configuration method.
The following methods are available:
- Automatic This method automatically configures your screens in terms of hierarchy, resolution and some more in-depth aspects. Offers the quickest and easiest way to configure your screens, but also the lowest number of options for manual configuration.
- Custom This method displays graphical representations of all screens recognised by this Thin Client with settings to designate a primary screen and set things like resolution and rotation. This method offers the highest number of directly adjustable settings.
- Expert When accessing this menu locally, this method offers access to the Screen Layout Editor. Furthermore, it allows to paste config-file contents to quickly configure the screen setup of multiple clients with the same settings. This method offers the largest amount of flexibility and depth, but it is also the most complex one to setup.
Desktop mode: allows you to choose how the desktop should be displayed across multiple screens. You can choose between the modes Extended, where the desktop of your primary screen will be extended to other screens like one continuous desktop, and Mirrored where the contents of your primary screen will be copied to other screens. The default setting is Extended.
Aggressive automatic configuration: Automatic method only! If you enable this setting, your screens will be automatically configured more aggressivly. Resolutions will be chosen, that are preferred by your screen and graphics card. However, this does not have to be the native resolution of your screen. Disabled by default.
Configuration: Custom method only! If you have activated custom configuration method, you will be shown graphical representations of any screen connected to the Thin Client, together with a number of settings. Ticking the checkbox labeled Enabled in the upper left corner of the graphical representation enables this screen and makes it possible to adjust its configuration. To designate a screen as primary monitor, you need to tick the corresponding checkbox labeled Primary.
Configuration tool: Expert method only! If you are accessing this menu locally on the Thin Client, you can access the Screen Layout Editor here, by clicking on the Configure button.
Color depth: allows you to choose the amount of colors that can be displayed. Higher values mean smoother transitions between shades of colors with more network traffic, while lower values mean rougher transitions between shades of colors with less network traffic. You can choose between 8-bit (lowest value), 16-bit and 24-bit (highest value). Default value is 24-bit.
Perform automatic configuration beforehand: Expert method only! If you enable this setting, your screens will be configured automatically before applying your custom configuration. This way, you can ensure that your screens will be setup properly, even when your custom configuration fails to be applied. Disabled by default.
Expert configuration: Expert method only! In this text area you can paste your desired config-file contents that should be applied to the screen configuration of this Thin Client.
Projection
Projector: Automatic & Custom method When holding a presentation, this setting is meant to clarify on which device the presentation is being held. This way, when you are mirroring your desktop onto the presentation device, the screen settings will be optimized for the latter. By default, the screen settings would be optimized for the primary screen.
Laptop monitor: When mirroring your desktop from a laptop, you can use the setting Laptop monitor to determine which screen belongs to the laptop. Used in combination with the Disable laptop monitor option of the setting When closing the laptop lid this helps determine the correct monitor to be switched off. Default setting is Primary monitor.
When closing the laptop lid: If you are mirroring your desktop from a laptop, you can use this setting, in conjunction with the setting Laptop monitor to determine the default behavior that occurs when the laptop lid is being closed. The following options are available:
- Do nothing
- Disable laptop monitor
- Disable all monitors
- Standby mode
- Shutdown
Monitor standby mode: allows you to determine how much time has to pass without any input until the connected screens enter the standby mode. If this is set to Off standby mode will be disabled. Default setting is Off.
Advanced Settings
Open X-TCP port: opens port 177 for the X Display Manager Control Protocol (XDMCP), which is used for remote logins to an X Display Manager server. Disabled by default.
Prevent tearing: Enabling this setting will synchronise the refresh rate of the graphics chip with that of your monitor to prevent tearing. Tearing occurs when the display output appears to tear apart, due to mismatched refresh rates. Disabled by default.
Enable 2D hardware acceleration:
If you are encountering performance issues on this Thin Client you can try disabling this setting to improve performance, at the cost of rendering quality.
Enabled by default.
Enable H264 hardware decoding:
Currently, the use of H264 hardware decoding might cause XServer to crash. This in turn causes problems with ICA and VMware remote-connections which can render these connections unusable.
H264 is one of the most common video compression standards.
If you are encountering issues with H264 applications, like video players, recording software, or any other video related application, you can try disabling this setting and see if this helps.
Enabled by default.
Driver for Intel graphics: Enables you to choose which driver to use for the integrated Intel graphics chip on your Thin Client.
We recommend to leave this setting on automatic. This will ensure that the Intel graphics chips in your Thin Client is provided with the correct driver for your setup.
If you prefer to manually choose the driver for the Intel graphics chip, you can choose between modesetting, a Xorg based open-source driver for KMS devices, and intel, the original graphics driver provided by Intel. Default setting is automatic (recommended).
Driver for NVIDIA graphics: Enables you to choose which driver to use for NVIDIA graphics cards in your Thin Client.
We recommend to leave this setting on nouveau.
If you prefer to manually choose the driver for the NVIDIA graphics card, you can choose between nouveau, an open-source driver for NVIDIA graphics cards, and nvidia, the proprietary graphics driver provided by NVIDIA. Default setting is nouveau.
Test these settings: Clicking on the Test button allows you to test your screen configuration, before applying them and thus needing to restart the Thin Client. After a few seconds the screen will revert to its previous configuration, if you do not confirm the screen settings in the corresponding dialog. This means that even when your configuration might cause display problems, this way you can still see if it works.
Miscellaneous
Ignore TCMS settings: If you want this Thin Client to ignore the TCMS settings regarding the screen configuration you can enable this setting. TCMS settings can be found under Remote Administration -> TCMS Settings . Disabled by default.