RangeeOS - Bildschirmfotos erstellen (Screenshots)
Mit Rangee OS ist es auf mehreren Wegen möglich, Bildschirmfotos für die weitere Verwendung zu erstellen. Hierzu kann entweder das in der Firmware integrierte Tool genutzt oder zusätzlich das Softwarepaket Flameshot (https://flameshot.org/) installiert werden.
Integriertes Bildschirmfoto-Tool
Die in der Firmware enthaltene Screenshot-Funktion finden Sie unter
Peripherie
→
Bildschirmfotos
. 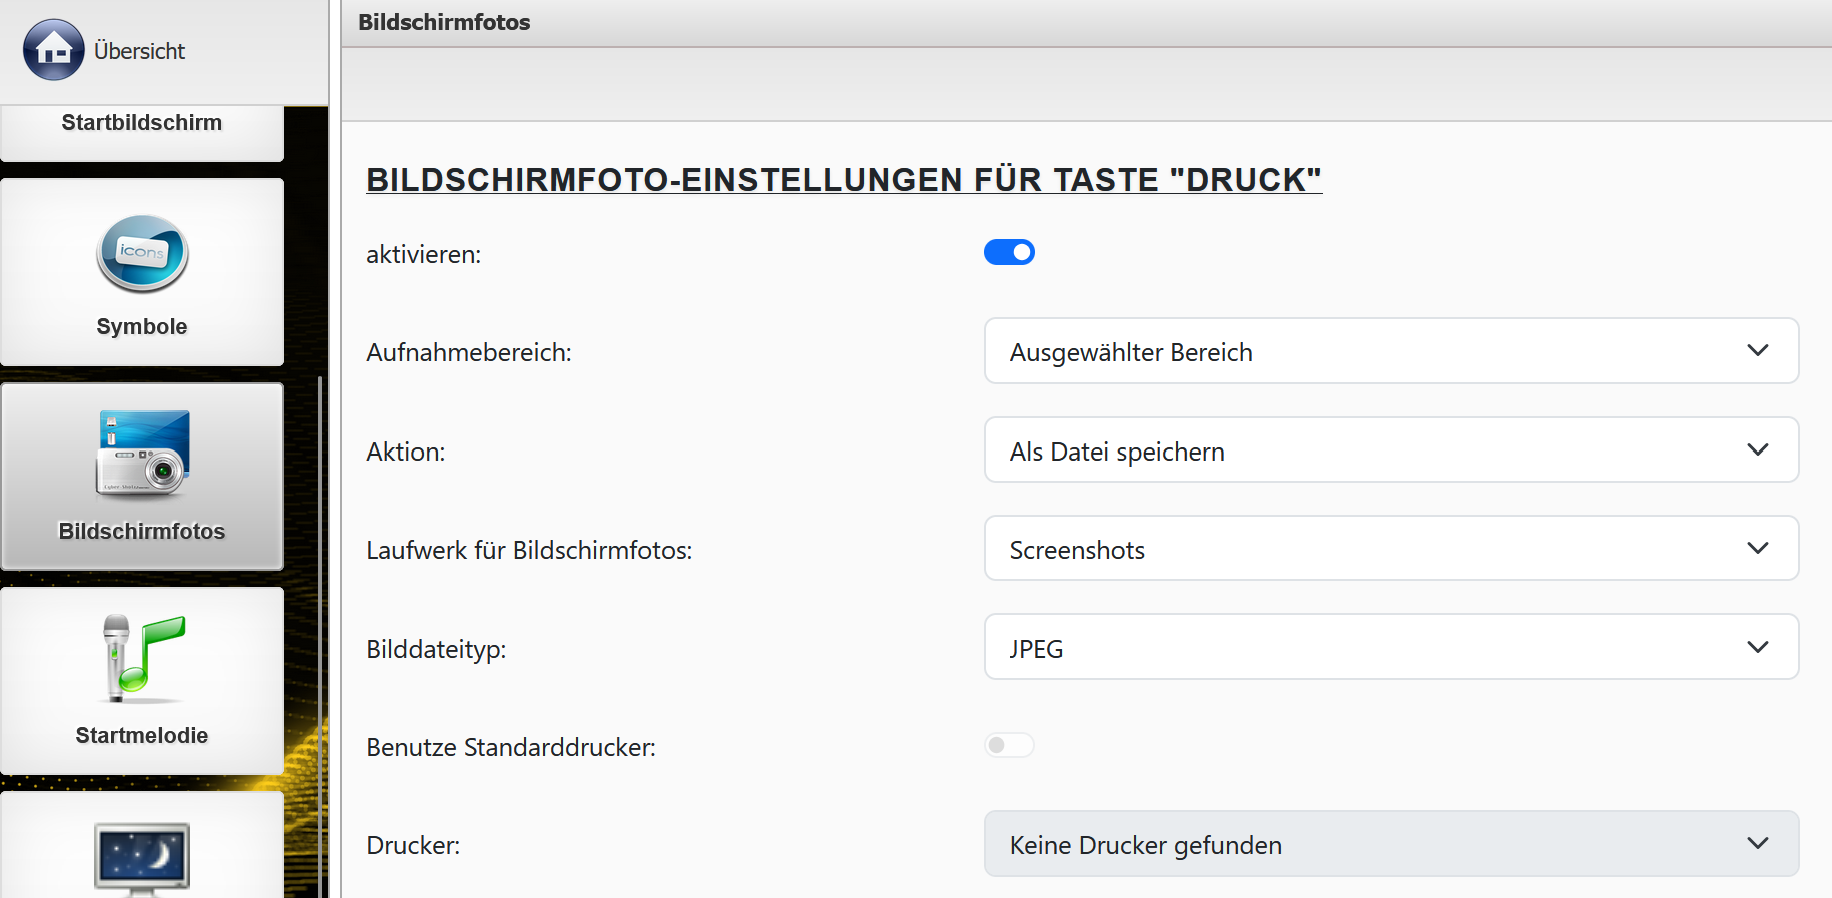
Hier können Sie für die Taste "DRUCK", die Tastenkombination "STRG+SHIFT+P" und/oder die Kombination "STRG+SHIFT+ALT+P" folgende Optionen konfigurieren:
| aktivieren | Aktiviert die jeweilige Tastenkombination. | Neustart erforderlich |
| Aufnahmebereich | Definiert den aufzunehmenden Bereich. Zur Auswahl stehen:
Wird "Ausgewählter Bereich" gewählt, verwandelt sich der Mauszeiger nach Betätigen der gewählten Tastenkombination in ein Fadenkreuz. Mit gedrückter Maustaste kann anschließend ein Bereich markiert werden. |
| Aktion | Legt fest, was mit dem erstellten Bildschirmfoto geschehen soll. Folgende Optionen stehen zur Verfügung:
|
| Laufwerk für Bildschirmfotos | Hier können Sie festlegen, auf welchem Laufwerk ein Screenshot gespeichert werden soll. Die Konfiguration von Laufwerken ist hier beschrieben: |
| Bilddateityp | Wählen Sie das Dateiformat für das Bildschirmfoto. Zur Auswahl stehen: Bitmap, GIF, JPEG, PDF, PNG und TIFF. |
| Benutze Standarddrucker | Ist diese Option in Kombination mit der Aktion "Drucken" aktiviert, wird das Bild immer auf dem im System festgelegten Standarddrucker ausgegeben. |
| Drucker | Wählen Sie hier einen festen Drucker für die Aktion "Drucken" aus. |
Flameshot
Über die Softwareaktualisierung können Sie zusätzlich das Open-Source-Screenshot-Tool Flameshot (https://flameshot.org/) installieren.
Sollte Ihnen das Modul nicht zur Installation angeboten werden, wenden Sie sich bitte an unseren Support unter support@rangee.com.
Nach der Installation kann das Modul über
Verbindungen & Anwendungen
→
Flameshot
konfiguriert werden.
Hier stehen Ihnen zwei modulspezifische Optionen zur Verfügung:
- Flameshot aktivieren / Verbindungsname
- Benutzerdefinierte Kommandozeilenparameter
Weitere Einstellungen zum automatischen Start und zur Symbolkonfiguration entsprechen den Firmware-Standardeinstellungen und sind identisch zu anderen Softwaremodulen. 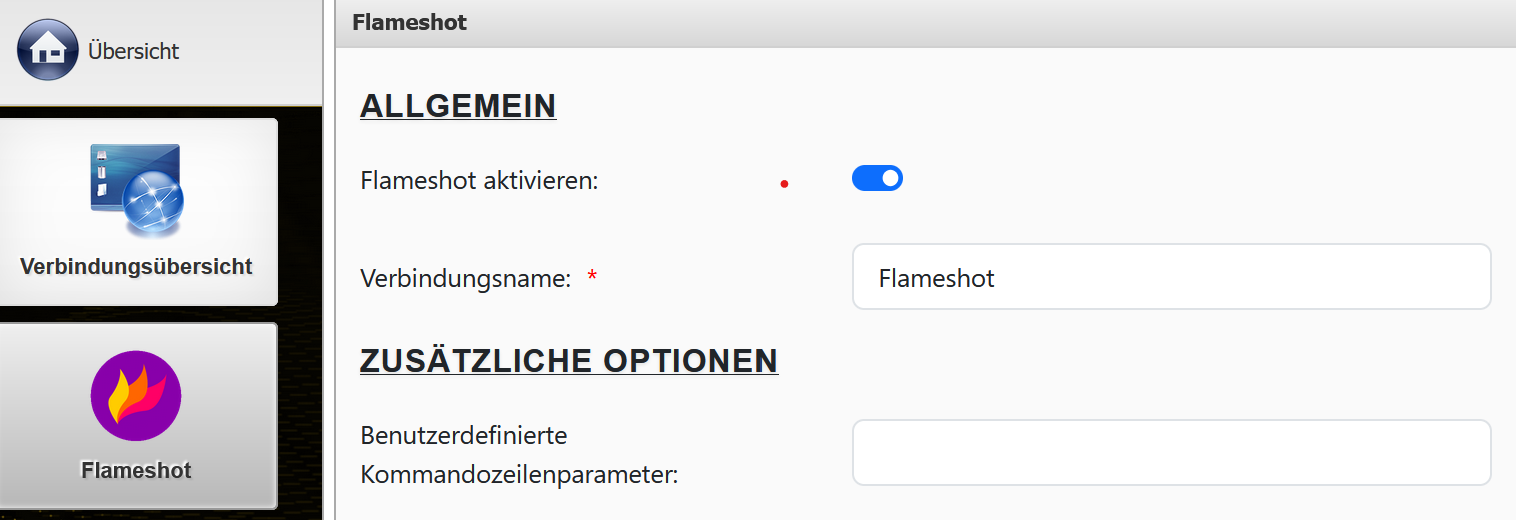
Nach dem Start des Moduls wird Flameshot über ein Tray-Icon gesteuert und konfiguriert. 
Ein Rechtsklick auf das Icon öffnet den Konfigurationsbereich. Ein Linksklick startet unmittelbar die Aufnahme eines Bildschirmbereichs. Nach Auswahl des Bereichs können verschiedene Optionen zur Anpassung und Speicherung des Bildes genutzt werden. 
Weitere Informationen zu Flameshot finden Sie in der offiziellen Dokumentation des Programms:
https://flameshot.org/docs/overview/overview/