Installation of Windows 10 IOT LTSC 2019
This how-to describes the different options for deploying a Windows 10 IoT image to a client device.
Installtion – Recovery from USB-Stick
For the following manual you need a USB-Stick (min. 500 MB). If you want to deploy the Image on the same USB-Stick you need at least 8GB capacity. Download the following files:
- The Rangee „Windows Flasher - Recovery Media Creation Tool“
- The Windows 10 IoT Image which fits to your device: „devicename_b###.wim“ (approx. 6GB)
Continue as follows:
- Plug in the USB-Stick into your PC
- Open the „Windows Flasher - Recovery Media Creation Tool“ (Run as administrator)
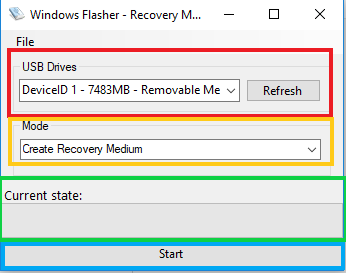
- Choose the USB-Stick under „USB Drives“ (If it's not displayed, please click „Refresh“) / marked red
- Choose a „Mode“ / marked yellow
- Create Recovery Medium:
- Rangee Recovery Console (The Windows-Image must eb deployed from a second USB-Stick or from a network drive
- Create Recovery Medium with 2nd data partition (W10 only)
- Create a medium only with the Rangee Recovery Console and a second partition for the Windows-Image
- This option can onlys be used if the „Recovery Media Creation Tool“ is runinng on Windows 10
- Erase USB Drive (Clean)
- Deletes all Partitionen (incl. data) from the medium
- Create Recovery Medium:
- Press „Start“ / marked Blue
- You can see the progress at „Current state“ / marked green
- Copy the Image to the USB-Stick (Partition „Image“), an other USB-Stick whihc is NTFS formatted or a networkdrive.
- Continue with „Rangee Recovery Console“
Recovery from an existing Windows 10 IoT installation
If you want to deploy the image with an USB-Stick, it has to be NTFS formatted and at least 8GB capacity.
- Download the Windows 10 IoT image which fits to your device: „devicename_b###.wim“ (approx. 6GB)
- Copy the image on a USB-Stick or a network drive
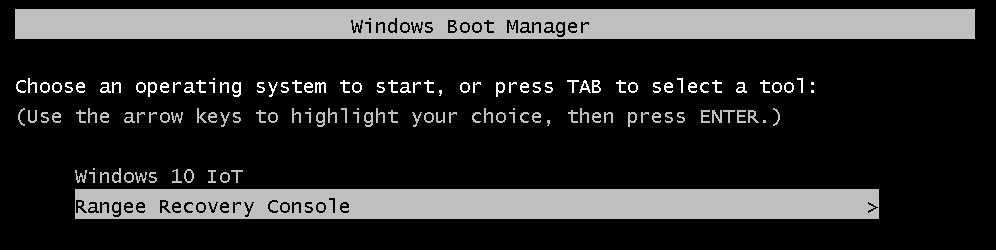
- Start the device and push the „Arrow down key“ until the windows bootloader appear:
- Choose „Rangee Recovery Console“
- Wait until the „Rangee Recovery Console“ is loaded and continue with „Rangee Recovery Console“ .
Rangee Recovery Console
Programs in the Recovery Console
In der Console angekommen, bieten sich Ihnen einige Programme, die Sie zu Diagnose- und Reparaturzwecken verwenden können:
| Command Promt: Notepad: Reboot: Regedit: Shutdown: Task-Manager: Windows Flasher: |
|---|

Windows Flasher
At the first start you'll see the following
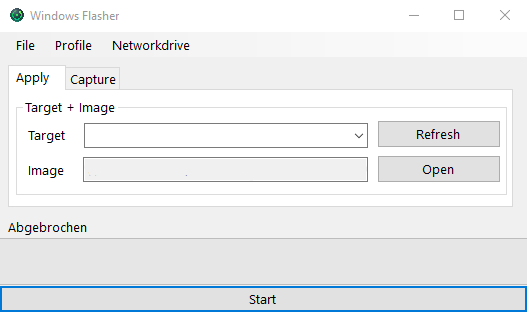
Deploy an Image
If you want to use an USB-Stick please be sure the USB-Stick is connected to the System.
If you want to use a network drive use „Networkdrive -> Connect Drive“:
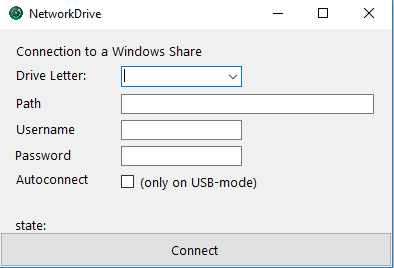
- Choose a drive letter
- Put in the complete UNC path to the share
- If nessecary put in the username and password
- The hook „Autoconnect“ persists the networkshare and autoconnect it on the next boot from this USB-Stick.
- You can finally connect the drive by clicking "Connect"
The installation
Use the following attributes:
| Parameter | Wert | Bedeutung |
| Target | # Disk ##GB | Choose the Drive on wich Windows 10 should be installed |
| Image | #Pfad zur „Gerätename_b###.wim“# | Choose the downloaded Windows 10 Image |
| Start | Start the installation |
Capturing a Windows image
You can capture an Image by using the „Capture“ function. This captured images can be deployed on other devices. Please run "sysprep" before capturing an image.
(https://docs.microsoft.com/en-us/windows-hardware/manufacture/desktop/sysprep--generalize--a-windows-installation)
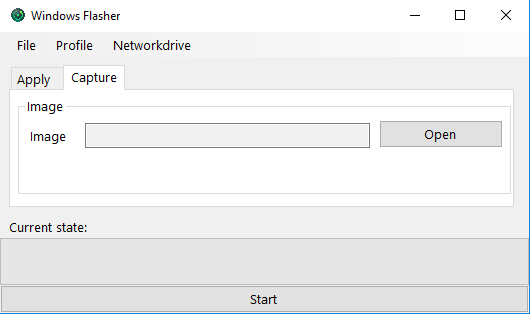
| Parameter | Wert | Bedeutung |
| Image | X:\path\Name.wim | Insert the path in which the captured image should be saved |
Logging
The Log can be views by clicking „File -> Open last Log File“