3.F.B. Network Configuration
|

 Network Configuration


(klicken Sie die Kacheln an um zum jeweiligen Punkt zu springen)
---
In this configuration screen you can set up the network environment for this Thin Client, or edit its corresponding data.
Clicking on the respective button in the upper left corner of the screen will take you to the corresponding configuration screen, allowing you to establish a network connection utilising the network protocol available in your network environment. The following network protocols are available to set up your clients' network environment:
Additionally, if your network uses a proxy server, you can provide all relevant data to the Thin Client in the Global proxy settings , which can be reached via the corresponding button. Lastly, further overarching settings can be reached by clicking on the button labeled global settings .
Network Environment
Host name: Here you can provide a name under which this device can be accessed via the network.
Search domain: The name of the domain to which this device belongs will be displayed in this field.
Workgroup: If this device should be assigned to a workgroup, you can provide the name of the workgroup in this field.
Time server (DHCP): If your network is being managed via DHCP and a time server is being used to determine the time, then its IP address will be displayed here.
Time server (manual): If your network utilises its own time server to determine the current time, you can enter the address under which it can be reached in this field.
DNS options: If any options were added to the file "resolv.conf", which is used to resolve DNS names, they will be displayed here. Options are added to the file as values for the key "options". These values, if available, will be displayed here.
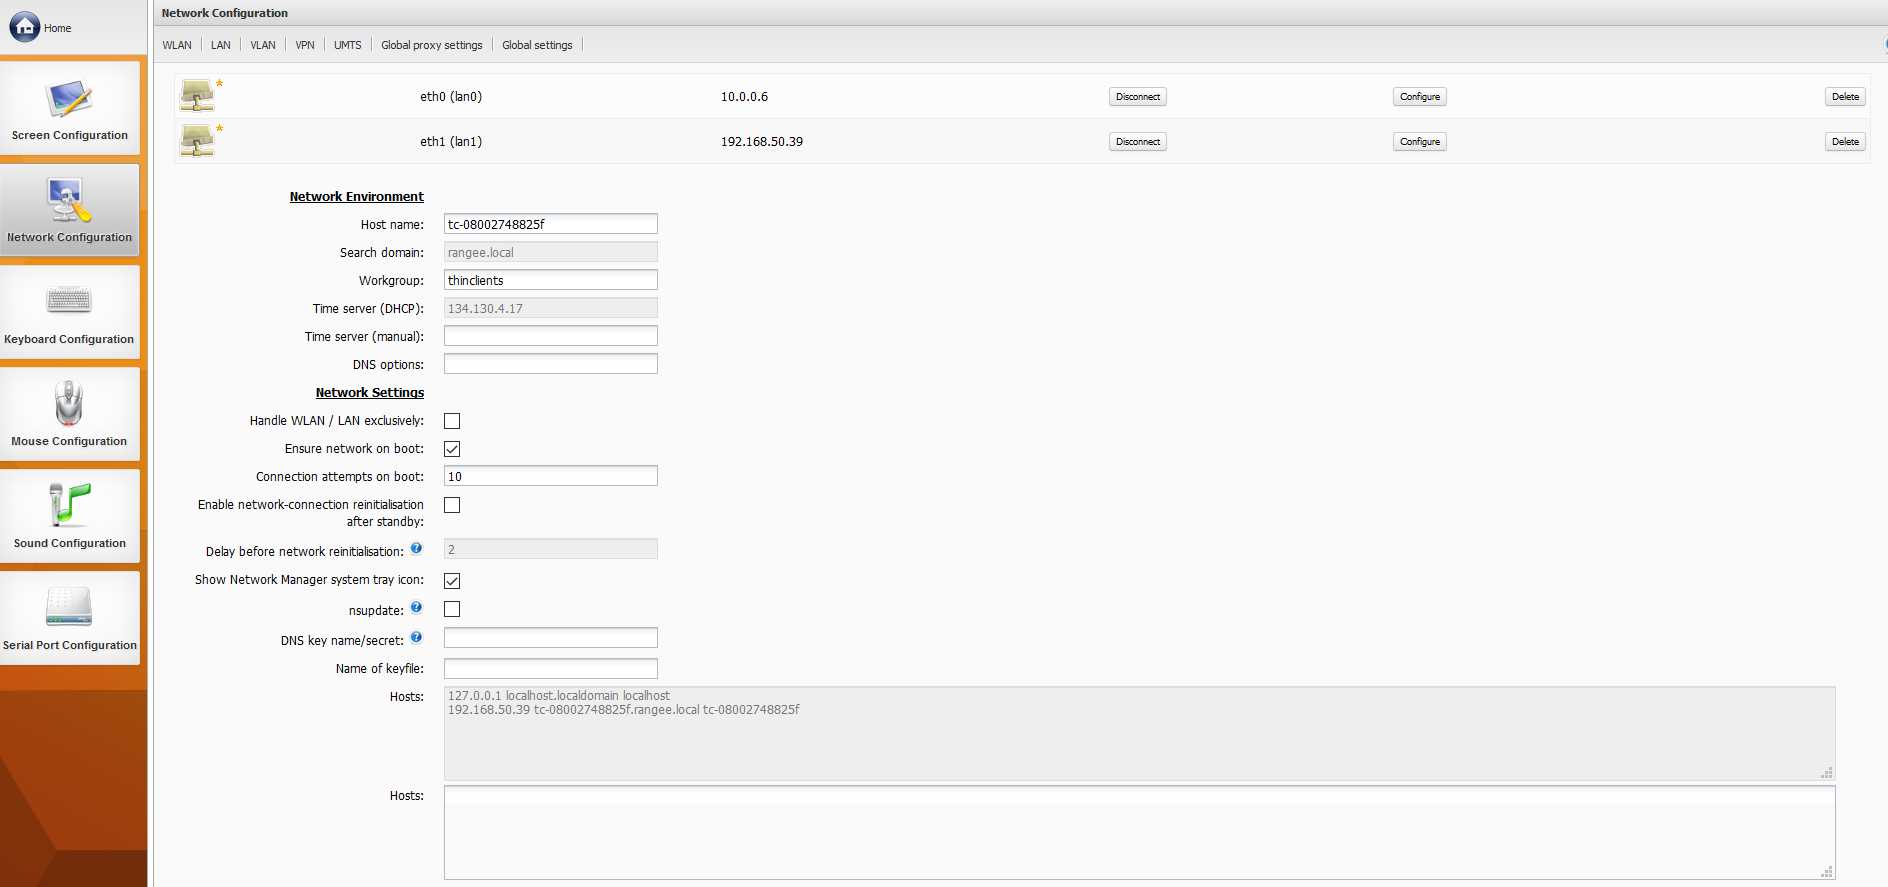
Network Settings
Handle WLAN / LAN exclusively: If this setting is enabled, this devices' WiFi reception will be switched on or off, depending on whether a LAN cable is plugged in. If a LAN cable is plugged in, WiFi reception will be disabled. If no LAN cable is plugged in, on the other hand, WiFi reception will be enabled.
Ensure network on boot: If this setting is enabled, the client will try to ensure that a network connection is established, before the desktop is initialized.
Connection attempts on system boot: Here you can determine, after what amount of unsuccessful connection attempts, while booting up the client, any further connection attempts should be ceased. The value needs to be provided as integer. Default value is 10.
Enable network-connection reinitialisation after standby: If this setting is enabled, your client's network manager will automatically attempt to re-establish any connection, that was set up on this system, when waking up from standby mode. Disabled by default.
Delay before network reinitialisation: If the setting Enable network-connection reinitialisation after standby is enabled, you can use this setting to determine how long the network manager should wait when waking up, before reinitialising any connection that was set up on this system. The value needs to be provided as integer in seconds. Default value is 2 seconds.
Show Network Manager system tray icon: If this setting is enabled, a system tray icon will be displayed to users of this client, granting direct access to the network manager. If users are not supposed to have that kind of access, this setting needs to be disabled. Enabled by default.
NSUpdate aktivieren: If this setting is enabled, this system will utilise the NSUpdate utility to submit dynamic DNS update requests. Disabled by default.
If you want dynamic DNS updates to be authenticated via transaction signatures, you will need a so-called secret as signature. This secret should only be known to NSUpdate and the name server. To provide this secret to dynamic DNS update requests, you can choose from both options found underneath. However, these options are mutually exclusive and, therefore, you will have to choose one which you prefer.
DNS keyname/secret: Creates a signature from keyname:secret, where keyname is the name of the key and secret is the base64 encoded shared secret. Use of this option is discouraged, however, as the shared secret will be supplied as command line argument in clear text.
Name of keyfile: With this option, NSUpdate reads the shared secret from the keyfile, whose name is of the form K{name}.+157.+{random}.private.
Hosts: In both of these textboxes the content of the clients' host file (/etc/hosts) is displayed.
The first textbox displays the IP addresses and hostnames of this client, first as localhost and then with the actual address under which it can be reached on the network. This textbox can not be edited, as it only serves to display this information.
The second textbox lists all further hosts, which are known to the client, also with IP address and hostname. This textbox can be edited, however, and thus enables you to correct this information or to add the addresses of further hosts.